24.09.2024 - (Week 1 - Week ) Kelly Lau Jie Ning/ 0354839 Sonic
Design/ Bachelor of Design (Honors) in Creative Media Lectures and
Exercises
INSTRUCTION
Lectures Week 1
In this week's lecture, Mr. Razif briefed us on our MIB. Mr. Razif
briefed our exercises and our projects. After a briefing session, Mr. Razif
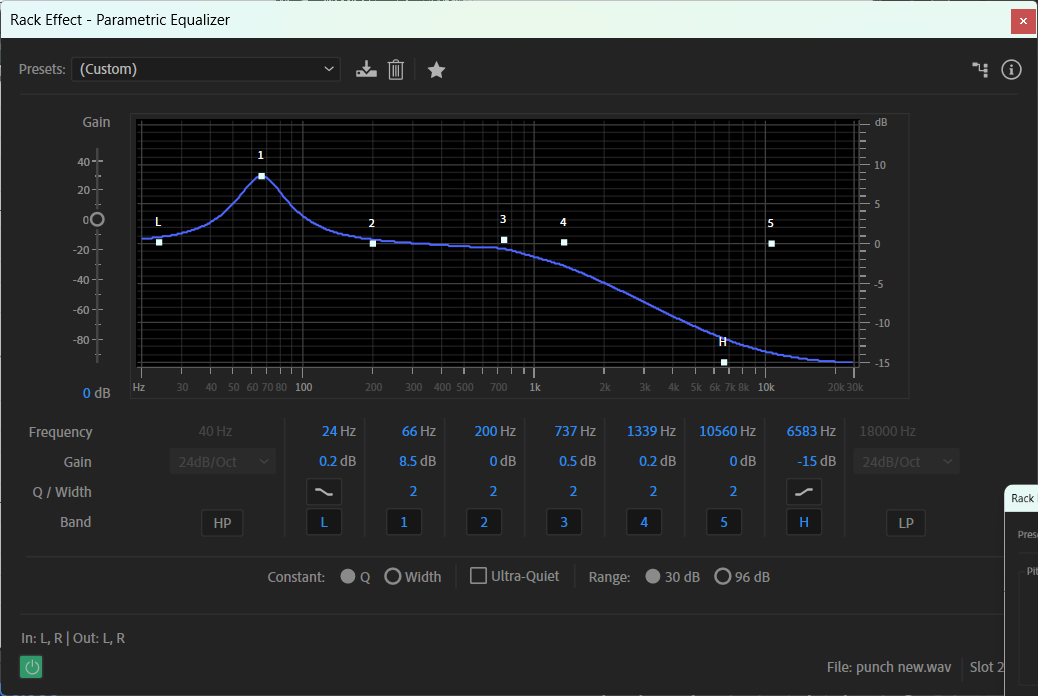
taught us the Parametric Equalizer function in Adobe Audition.
In the Parametric Equalizer, we can focus on adjusting the low, mid, and high
frequencies to control our audio's overall balance and sound quality.
1. Low Frequency (Bass)
Frequency range: 20Hz - 250Hz
Controls: Deep sounds like drums, bass, and low-end noise.
Adjust:
Boost: Adds fullness and power to bass.
Cut: Reduces muddiness and unwanted background noise.
2. Mid Frequency
Frequency range: 250Hz - 4kHz
Controls: The body of the sound, including vocals and instruments.
Adjust:
Boost: Brings out vocals and instruments, adding clarity.
Cut: Reduces muddiness, especially in the 300Hz - 600Hz range.
3. High Frequency (Treble)
Frequency range: 4kHz - 20kHz
Controls: Brightness and clarity in high-pitched sounds.
Adjust:
Boost: Adds sharpness and detail.
Cut: Softens harsh or piercing sounds
Parametric Equalizer
Week 2
Sound Fundamentals
Supplementary Video on Equaliser
Week 3
Additional Lecture Video - The Art of Sound Design
Week 4
Exercises Exercise 1 This exercise was given in week 1. In this
exercise, we are given some audio frequencies which are flat, eq1, eq2,
eq3, eq4,eq5, and eq6. We need to make those eq1, eq2, eq3, eq4, eq5 and eq6
audio frequencies like flat audio frequencies. We need to adjust those audio
frequencies in the Parametric Equalizer.
Equalizer 1, Week 1 (27/09/2024)
Equalizer 2,Week 1 (27/09/2024)
Equalizer 3,Week 1 (27/09/2024)
Equalizer 4,Week 1(27/09/2024)
Equalizer 5,Week 1(27/09/2024)
Equalizer 6,Week 1(27/09/2024)
Exercise 2
For this exercise, Mr Razif provided us with a sample voice and we needed to
make the voice to the different sound effects which are telephone, closet,
walkie-talkie, bathroom, and stadium.
Sample Voice
Sample Voice of Telephone
Sample Voice of the Telephone,Week 2 (04/10/2024)
Sample Voice of Closet
Sample Voice of the Closet,Week 2 (04/10/2024)
Sample Voice of Walkie-Talkie
Sample Voice of Walkie-Talkie,Week 2 (04/10/2024)
Sample Voice of Bathroom
Starting from the sample voice of the bathroom, we need to use reverd.
Sample Voice of Bathroom,Week 2 (04/10/2024)
Sample Voice of Bathroom,Week 2 (04/10/2024)
Sample Voice of Stadium
Sample Voice of Stadium,Week 2 (04/10/2024)
Sample Voice of Stadium,Week 2 (04/10/2024)
Exercise 3
In this exercise, we are given 2 pieces of audio explosion and punch. We
need to do an explosion, punch and firework soundtrack.
Explosion
Punch
Firework
I do two types of fireworks for the fireworks to make it a whole firework
soundtrack.
This is the shorter version of fireworks.
After I listened to the version that I adjusted above I felt a bit weird so I
tried to adjust the Parametric Equalizer again.
After that, this is another version of fireworks. It sounds deep and
big.
After the adjustment above, I feel not really good enough so I adjust the
Parametric Equalizer again.
After I had done two types of fireworks, I combined them together to create
a firework soundtrack.
Exercise 4
Jetplane
Sir also gave us two environmental pictures and we need to soundtrack the
photos.
Environment 1
Environment 2
Reflection
The Sonic Design Exercises taught me a lot about audio editing and sound design. Each exercise gave me the chance to learn new techniques and practice using audio tools.
In Exercise 1, we adjusted six different audio frequencies (eq1, eq2, eq3, eq4, eq5, and eq6) to make them sound like the flat audio frequency using the Parametric Equalizer. This helped me understand how to balance sound by adjusting frequencies and fine-tuning audio.
In Exercise 2, we worked with a voice sample to create different sound effects, like telephone, closet, walkie-talkie, bathroom, and stadium. This was a creative task that showed me how sound changes in different environments and how to use effects like reverb and distortion to match those scenarios.
In Exercise 3, we created soundtracks for explosions, punches, and fireworks using given audio files. By layering and editing sounds, I learned how to make effects more realistic and impactful. Additionally, we designed soundscapes for two environmental pictures, which taught me how to use sound to bring visuals to life and create an atmosphere.
Through these exercises, I learned how to use tools like the Parametric Equalizer, layer and modify sounds, and match audio to visuals. It was a great experience that improved my audio editing skills and creativity, and I’m excited to use these skills in future projects.
13.02.2024- 21.02.2024/ Week 2-Week 3 Kelly Lau Jie Ning/ 0354839 Design Principles/ Bachelor of Design (Honors) in Creative Media Task 1- Exploration INSTRUCTION Recap SDG 14 Life Below Water Task 1:Exploration In this task, we need to put our picks and briefly describe one goal from the United Nations Sustainable Development Goals (UNSDG) . We must also recap the design principles: gestalt theory, contrast, emphasis, balance, repetition, movement, harmony & unity, symbol, word and image. After we pick the goal, we need to select an existing art/design work that revolves around that goal of our choice. Beneath the image, include the credit line of the art/design work (title of art/design work, artist’s/designer’s name, year, size, medium, source link). Some works...
24.09.2024 - (Week 1 - Week 14 ) Kelly Lau Jie Ning/ 0354839 Minor Project/ Bachelor of Design (Honors) in Creative Media INSTRUCTION Weekly Progression Week 1 After listening to Mr. Mike's briefing, I started researching Warisan XR and their work. I also looked into the AR glasses that will be used in the exhibition. During the briefing, Mr. Mike mentioned that this project would involve Spatial Recognition and Volumetric Video (3D Capture Technology), so I conducted research on these technologies as well. Here is my contextual research mindmap for combining all my research. To better understand the exhibition space, my teammates and I planned a visit to Museum Negara for an on-site investigation. Week 2 This week, we worked on creating the user journey. Before starting, we conducted research to identify the groups that visit Museum Negara the most. Based on our findings, we categorized the use...
03.02.2026-29.03.2026 (Week 1-Week 7) Kelly Lau Jie Ning/ 0354839 Major Project 2/ Bachelor of Design (Honors) in Creative Media INSTRUCTION Week 1 Goal The goal for this week was to explore and understand the UI design of horror games, especially for the main menu. I wanted to collect good references and get inspiration for layout, style, and user experience. At the same time, I aimed to start developing initial ideas for our own game’s main menu design. Implementation In this week, I searched for different horror game UI references, focusing mainly on main menu designs. I looked at how other games arrange their elements such as title, buttons, background visuals, and overall mood. Reference link: https://www.artstation.com/artwork/gR6RBK https://www.artstation.com/artwork/JrWgvZ https://www.artstation.com/artwork/K3ykDB After gathering references, I started sketching some ideas. I experimented with several layouts, trying different positions for the game title, buttons, and...


Comments
Post a Comment